
After Crankshaft replacing the sensor, you should check for proper installation, test the functionality of the new sensor, review the vehicle’s performance, and observe safety measures while troubleshooting any issues.
Introduction
Definition of Crankshaft Sensor
The Crankshaft Sensor, also known as the crank position sensor, is a critical component in modern vehicles. This sensor primarily detects and monitors the speed and position of the crankshaft, a key engine component. It sends this data to the vehicle’s Engine Control Unit (ECU), allowing it to make critical decisions about fuel injection and ignition timing.
For more details about this vital component, refer to its Wikipedia page.
Importance of a Crankshaft Sensor
The Crankshaft Sensor’s primary role in a vehicle can’t be overstated. Without the sensor’s precise data, the ECU would have no basis for adjusting the engine’s operations. Consequently, this could lead to issues ranging from poor fuel economy and performance to complete engine failure.
To understand more about the function of various car sensors, visit the Car Sensors Wikipedia page.
Signs of a Bad Crankshaft Sensor
Recognizing the signs of a failing Crankshaft Sensor is critical for maintaining your vehicle’s health. Some of these signs include:
- Intermittent stalling: If your car randomly stalls while driving, it could be a sign of a bad Crankshaft Sensor.
- Difficulty starting: A failing sensor can make starting the car difficult.
- Check Engine light: The “Check Engine” light might come on if the Crankshaft Sensor is not working correctly.
- Poor fuel economy: A malfunctioning sensor can lead to a decrease in fuel efficiency.
For more detailed information about the signs of a failing sensor, check out the Engine Sensor page on Wikipedia.
Understanding the Replacement Process
When to Consider Replacing a Crankshaft Sensor
The Crankshaft Sensor is a durable part, but like any other component, it is prone to wear and tear over time. As discussed earlier, the key signs of a failing Crankshaft Sensor include issues with starting the car, the engine stalling, poor fuel economy, and the “Check Engine” light turning on. Should you notice any of these symptoms, it’s likely time to consider replacing the sensor.
For further reading on the common problems of crankshaft sensors, you can visit this Wikipedia link.
The Tools Required for Replacement
Before you begin the replacement process, it’s vital to gather all the necessary tools. Typically, you will need:
- Socket set: To remove and replace the sensor.
- Screwdriver: If any screws secure the sensor.
- Jack and jack stands: To safely lift and secure the vehicle.
- Work gloves: To protect your hands.
- Safety glasses: To protect your eyes from any debris.
For more detailed information about automotive repair tools, you can check the Automotive Tools Wikipedia page.
Steps in Replacing a Crankshaft Sensor
Here is a general step-by-step guide on how to replace a Crankshaft Sensor:
- Ensure Safety: Make sure the vehicle is parked on a level surface, the engine is off, and the handbrake is engaged.
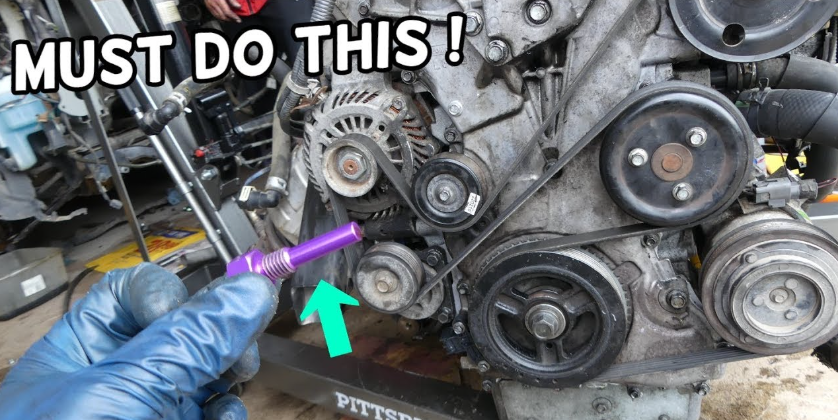
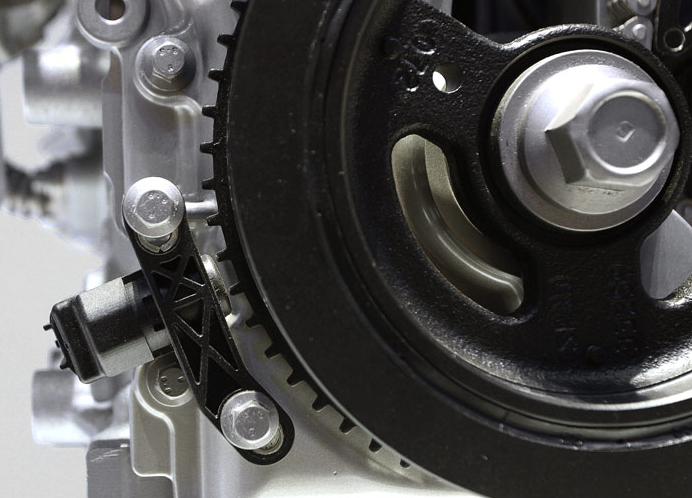
- Access the Crankshaft Sensor: The sensor’s location varies depending on the vehicle model. Typically, it is near the crankshaft at the bottom of the engine. You might need to lift the vehicle using a jack and secure it with jack stands.
- Remove the Old Sensor: After locating the sensor, remove it by detaching any screws or bolts holding it in place. Once it’s loose, carefully pull the sensor free from its socket.
- Install the New Sensor: Position the new sensor in place, and secure it using the screws or bolts you removed earlier.
- Confirm Installation: Double-check your work to ensure the sensor is securely in place.
For a more detailed guide on replacing car parts, check the Auto Parts Replacement Wikipedia page.
Post Replacement Steps
Checking for Proper Installation
After installing the new Crankshaft Sensor, it is essential to confirm that it has been properly installed. Ensure that it’s securely positioned and the bolts or screws are tightened to the recommended torque. Double-check that the sensor’s electrical connector is secure, as a loose connection can cause issues with signal transmission.
For more information on the proper installation of car parts, you can visit the Automotive Service Excellence page on Wikipedia.
Testing the Functionality of the New Sensor
Once the sensor is in place, start the engine to test its functionality. The vehicle should start smoothly and the “Check Engine” light should stay off if the sensor is working correctly. Use an OBD II Scanner to ensure no error codes are being thrown that could be associated with the Crankshaft Sensor.
For more details about the On-Board Diagnostics system, you can check out its Wikipedia page.
Reviewing the Performance of the Vehicle
After the sensor’s successful installation and testing, it’s time to review the overall performance of the vehicle. Drive the vehicle under various conditions – idle, city driving, and highway driving. Pay attention to how the engine is running. If you notice an improvement in fuel economy, engine performance, and the absence of previous issues, this indicates that the Crankshaft Sensor was successfully replaced.
For more insights about vehicle performance review, check the Vehicle Performance Wikipedia page.
Safety Measures and Troubleshooting
Safety Measures to Keep in Mind During Replacement
When replacing the Crankshaft Sensor, safety should be your primary concern. Below are some safety measures to keep in mind:
- Ensure the vehicle is secure: If you need to lift the vehicle, use a jack and secure it with jack stands. Never work under a vehicle supported only by a jack.
- Disconnect the battery: To prevent any electrical issues or potential shocks, it’s always a good idea to disconnect the car battery before starting work.
- Wear safety equipment: This includes gloves to protect your hands and safety glasses to shield your eyes from debris.
For more details about safety in automotive repair, you can visit the Workplace Safety and Health in Vehicle Repair Wikipedia page.
Common Issues After Replacing a Crankshaft Sensor
While a new Crankshaft Sensor should rectify most issues, sometimes problems can still occur. These can range from a simple loose electrical connector to a faulty new sensor. The “Check Engine” light might come on, or you may experience issues with starting the vehicle or poor engine performance. Always double-check your work and ensure the new sensor is not faulty.
For a more comprehensive understanding of common car problems, check out the Car Troubles Wikipedia page.
How to Troubleshoot Issues
Should you encounter any issues after the replacement, it’s crucial to know how to troubleshoot. Here are a few steps:
- Check the installation: Reconfirm the sensor’s installation. Make sure it’s secure and the electrical connector is firmly in place.
- Use an OBD II Scanner: Scan for any error codes. If the scanner indicates an issue with the Crankshaft Sensor, the new sensor might be faulty.
- Professional help: If you can’t resolve the issue yourself, it’s recommended to seek professional assistance.
For more insights about car troubleshooting, visit the Automotive Troubleshooting Wikipedia page.
Maintenance Tips for a Crankshaft Sensor
Regular Inspection
While the Crankshaft Sensor is designed to last for a considerable period, it’s wise to inspect it regularly. During regular car maintenance, take the time to visually check the sensor. Look for obvious signs of damage, such as cracks, corrosion, or loose connections. If you notice anything unusual, consider a professional evaluation.
For more information on regular car maintenance, you can visit the Vehicle Maintenance Wikipedia page.
Keeping the Sensor Clean
One key aspect of maintaining the Crankshaft Sensor is ensuring it remains clean. Over time, the sensor can accumulate dirt, oil, and other contaminants that can interfere with its function. You can use a throttle body or mass air flow sensor cleaner to clean the sensor, but remember to disconnect it first.
For additional tips on cleaning car parts, check out the Auto Detailing Wikipedia page.
Preventing Common Sensor Issues
Prevention is always better than cure. To avoid common Crankshaft Sensor problems:
- Regular Maintenance: As already discussed, regular inspection and cleaning can prevent many issues.
- Quality Parts: Always opt for high-quality replacement parts. Low-quality sensors might fail prematurely.
- Proper Installation: Incorrect installation can lead to a host of problems. Ensure the sensor is correctly installed and the electrical connection is secure.

To understand more about preventing common car problems, visit the Preventive Maintenance Wikipedia page.
Reference
- Crankshaft Position Sensor – Wikipedia
- Automotive Tools – Wikipedia
- Auto Parts Replacement – Wikipedia
- National Institute for Automotive Service Excellence – Wikipedia
- On-Board Diagnostics – Wikipedia
- Automobile Performance – Wikipedia
- Workplace Safety and Health in Vehicle Repair – Wikipedia
- Car Troubles – Wikipedia
- Automotive Troubleshooting – Wikipedia
- Vehicle Maintenance – Wikipedia
- Auto Detailing – Wikipedia
- Preventive Maintenance – Wikipedia