To test a crankshaft position sensor, disconnect the sensor, connect a multimeter to the sensor’s connector, crank the engine, and interpret the voltage readings.
A fluctuating voltage typically indicates a functioning sensor, while a constant or no voltage suggests a faulty sensor.

Introduction
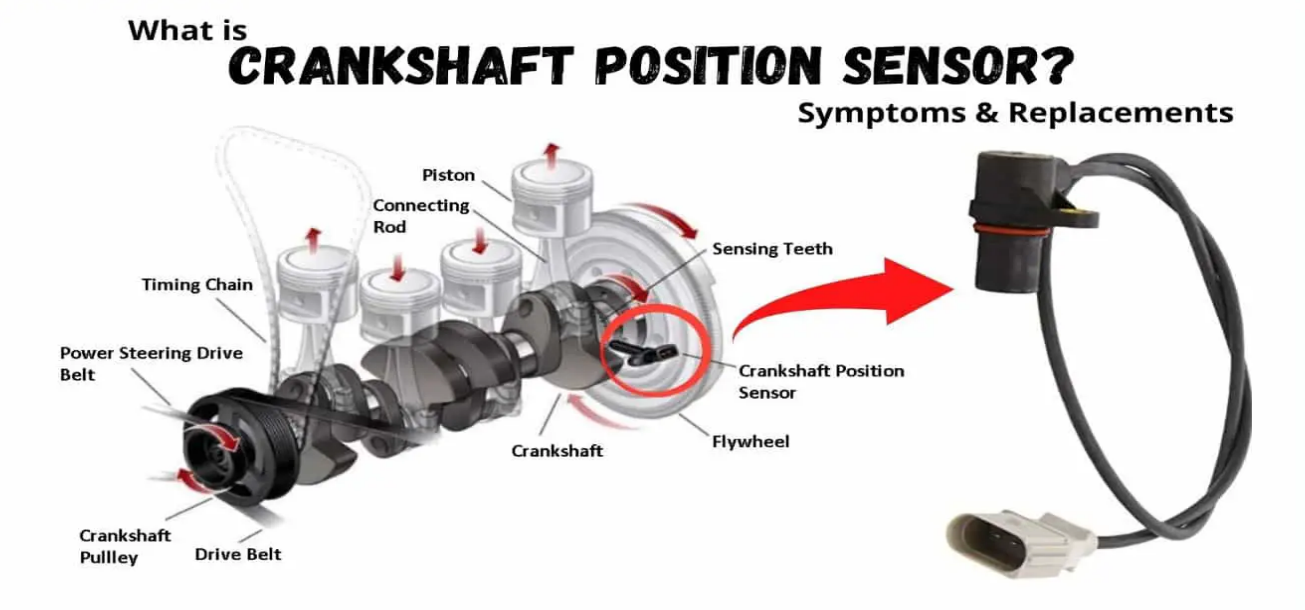
The crankshaft position sensor is an integral component of any vehicle’s engine management system. It is essential in the monitoring and controlling of engine functions such as ignition timing and fuel injection. This sensor’s main role is to relay the crankshaft’s position and rotational speed to the Engine Control Unit (ECU), thereby allowing the ECU to make necessary adjustments for optimal engine performance.
This section will delve into the nitty-gritty of what the crankshaft position sensor is and why it is crucial to your vehicle’s operation.
Understanding the Crankshaft Position Sensor
The Crankshaft Position Sensor is an electronic device that is usually located on the engine’s crankshaft. It generates an electrical signal, which varies with the rotation of the crankshaft. This signal is read by the car’s computer (ECU), which uses the information to control the ignition and fuel injection systems.
When the crankshaft rotates, the sensor sends a signal to the ECU indicating the location of the pistons within the cylinders. This information is critical for the precise timing of spark plug firing and fuel injection.
Importance of the Crankshaft Position Sensor
The crankshaft position sensor plays a vital role in engine management. Its signals are used for several critical processes, including:
- Fuel Injection Timing: The ECU uses the data from the sensor to time the opening of the fuel injectors. This ensures that fuel is delivered to the cylinders at the right moment for efficient combustion.
- Ignition Timing: The sensor’s data also helps the ECU determine when to fire the spark plugs, which ignites the air-fuel mixture in the engine’s cylinders.
- Misfire Detection: If the crankshaft doesn’t rotate smoothly or at the expected speed, the ECU identifies this as a misfire. This helps protect the engine from damage and can prevent potential safety hazards.
Given the vital role it plays, a faulty crankshaft position sensor can lead to poor engine performance or even complete engine failure. Therefore, understanding its operation and keeping it in good working condition is essential.
Identifying Symptoms of a Bad Crankshaft Position Sensor
A faulty crankshaft position sensor can cause a variety of issues with your car. Recognizing these signs can save you from a sudden breakdown or costly repairs. The following subsections will discuss some of the common symptoms associated with a bad crankshaft position sensor.
Difficulty Starting the Car
One of the most common signs of a faulty crankshaft position sensor is trouble starting the car. The sensor sends signals to the car’s ECU, which then determines the correct fuel and spark plug timing needed to start the engine. If the sensor is malfunctioning, the ECU may not receive the correct information, leading to difficulties when starting the vehicle.
Engine Misfires
An engine misfire is another symptom of a potentially faulty crankshaft position sensor. The misfire occurs when the ECU doesn’t receive accurate information from the sensor, causing incorrect spark plug firing or fuel injection timing. This may lead to the engine running roughly or unevenly.
Poor Acceleration
Poor acceleration can also suggest a problem with the crankshaft position sensor. A faulty sensor may send incorrect signals to the ECU, disrupting the optimal fuel-air mixture and ignition timing necessary for the engine to accelerate smoothly. This could result in your vehicle not responding as expected when you press the accelerator pedal.
Stalling or Erratic Idling
If your car is stalling or idling erratically, it might be due to a malfunctioning crankshaft position sensor. As the sensor feeds vital data to the ECU, an inaccurate signal can lead to erratic engine behavior, such as stalling or rough idling.
Check Engine Light Illuminated
One of the most obvious signs of a problem with your car’s engine is the illumination of the Check Engine Light on your dashboard. If the crankshaft position sensor is faulty, it can trigger this warning light. However, remember that the Check Engine Light could also be triggered by a range of other issues, so it’s crucial to have your vehicle inspected by a professional when this light comes on.
Tools Needed to Test a Crankshaft Position Sensor
Before you start the process of testing a crankshaft position sensor, it’s essential to gather all the necessary tools. Having the right tools will make the job easier and safer. Here’s what you’ll need:
Multimeter
A multimeter is the most crucial tool you’ll need for this task. This electronic measuring instrument combines several measurement functions in one unit. A typical multimeter can measure voltage, current, and resistance, which are the key measurements needed to test the crankshaft position sensor. Choose a multimeter that is easy to use and read, with a range that can accommodate your vehicle’s sensor specifications.
Basic Toolkit
A basic toolkit is indispensable for any DIY car repair or maintenance task. For testing a crankshaft position sensor, you’ll typically need a set of screwdrivers and wrenches to access the sensor. The specific tools required may vary depending on your vehicle’s make and model, so it’s a good idea to refer to your car’s service manual for detailed instructions.
Personal Safety Equipment
When dealing with any car repair or maintenance task, safety should be your number one priority. Here is some basic personal safety equipment you should have:
- Safety Glasses: Protect your eyes from potential debris.
- Gloves: Protect your hands from sharp edges and keep them clean.
- Coveralls or Old Clothes: Car repair and maintenance can be a dirty job, so it’s advisable to wear clothing that you wouldn’t mind getting dirty or damaged.
Remember, having the right tools is just the first step. Make sure you also have a good understanding of how to use them and always prioritize safety.
Pre-Test Preparations
Before you start testing the crankshaft position sensor, there are some important preparatory steps to take. These include locating the sensor in your car, observing necessary safety precautions, and properly disconnecting the sensor.
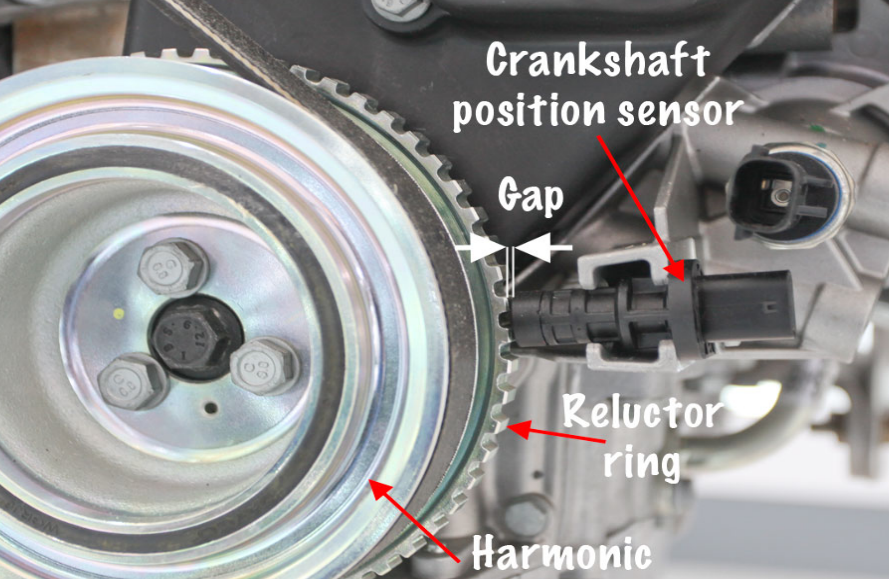
Locating the Crankshaft Position Sensor
The location of the crankshaft position sensor can vary depending on the make and model of your car. Generally, it’s located near the crankshaft, which is at the bottom of the engine, usually close to the transmission. Check your vehicle’s service manual for specific location information.
Sometimes, it might be difficult to locate due to other components obstructing your view or physically blocking access to the sensor. It may require removing some parts to reach it. Remember to take note of how everything is assembled to ensure a smooth reassembly process later.
Safety Precautions
Safety is paramount when working on any automotive repair or maintenance tasks. Here are some safety precautions to keep in mind:
- Ensure your car is turned off before you start working. This will prevent any accidental starts that could lead to injuries.
- Wear the appropriate personal safety equipment, including safety glasses and gloves.
- If you need to lift your vehicle to access the sensor, use a professional-grade jack and jack stands. Never work under a car supported only by a jack.
Disconnecting the Sensor
Once you’ve located the sensor and observed all necessary safety precautions, the next step is to disconnect the sensor. First, locate the wiring harness connector on the sensor. Press down on the locking tab and pull the connector out. Be sure to pull on the connector and not the wires to avoid any damage.
Keep in mind that the specifics of this process may vary depending on your car’s make and model. Refer to your vehicle’s service manual for detailed instructions. After disconnecting, you’re now ready to proceed to the testing phase.
Testing the Crankshaft Position Sensor
After the preliminary steps, you’re now ready to test the crankshaft position sensor. The procedure involves using a multimeter and interpreting the results to determine whether the sensor is functioning correctly.
Using a Multimeter
A multimeter is an essential tool for this test. Here are the steps to use a multimeter to test a crankshaft position sensor:
- Setting Up the Multimeter: Set your multimeter to the DC voltage setting.
- Connecting the Multimeter: Connect the multimeter’s red lead to the signal wire on the sensor’s connector and the black lead to the ground. The signal wire is usually the middle wire on a three-wire sensor, but you should consult your service manual to be sure.
- Reading the Multimeter: With the multimeter connected, crank the engine and watch the multimeter’s readings.
Interpreting the Results
The multimeter should show a voltage reading when you crank the engine. The specific voltage you’re looking for can vary depending on your vehicle, so you should consult your service manual for the exact specifications.
Typically, if the sensor is functioning correctly, you’ll see a fluctuating voltage that changes as the engine cranks. If the sensor is faulty, the multimeter may show no voltage or a constant voltage that doesn’t change as the engine cranks.
Remember that while a faulty reading on the multimeter does suggest a problem with the sensor, it could also indicate other issues such as a problem with the wiring or the ECU. If you’re unsure, it’s always best to consult with a professional mechanic.
Handling a Faulty Crankshaft Position Sensor
After conducting the test, you might conclude that the crankshaft position sensor is faulty. This section will guide you on when to consider replacing the sensor and provide a basic step-by-step guide to replacing it. Remember that the specifics can vary depending on your car’s make and model, so always refer to your service manual for detailed instructions.
When to Replace the Sensor
If you’ve done the test and the results indicate a faulty sensor, replacement is typically the best option. It’s also advisable to replace the sensor if you’ve been experiencing symptoms of a faulty sensor and other potential causes have been ruled out. A malfunctioning crankshaft position sensor can lead to serious engine damage if not addressed promptly.
Step-by-Step Replacement Guide
Here’s a basic step-by-step guide on how to replace a crankshaft position sensor:
- Disconnect the Sensor: Disconnect the wiring harness from the sensor, as described in the pre-test preparations section.
- Remove the Sensor: The sensor is usually held in place by a bolt or screw. Remove this fastener and then pull the sensor out of its mounting position.
- Install the New Sensor: Insert the new sensor into the mounting position and secure it with the fastener.
- Reconnect the Sensor: Reconnect the wiring harness to the new sensor.
- Test the New Sensor: After replacing the sensor, it’s a good idea to test it to make sure it’s working properly.
Remember to always follow your vehicle’s service manual for specific instructions and torque settings. And if you’re not comfortable doing this job yourself, don’t hesitate to take your vehicle to a professional mechanic.
Reconnecting the Crankshaft Position Sensor
After replacing a faulty crankshaft position sensor with a new one, such as those made by reputable brands like FEDA, it’s crucial to properly reconnect the sensor. Ensuring the sensor is functioning correctly after reconnection is also important.
Reattaching the Sensor
Reattaching the crankshaft position sensor involves reconnecting the wiring harness that was previously disconnected. Locate the wiring harness connector and the corresponding port on the sensor. Make sure to align them correctly and then push the connector into the port until it clicks into place, indicating a secure connection.
Remember, each sensor and vehicle model might have a different way of attaching the wiring harness, so always refer to your vehicle’s service manual or consult with a professional if you’re unsure.
Confirming the Sensor is Functioning Properly
After reattaching the sensor, it’s crucial to confirm that the new sensor is functioning correctly. You can do this by repeating the testing process outlined earlier.
Start your vehicle and observe for any recurring symptoms of a faulty sensor, such as difficulty starting the engine, engine misfires, or the Check Engine Light illuminating. If you’re still experiencing these issues, there might be a problem with the new sensor or another component of the vehicle.
Remember, working with car electronics can be complicated. If you’re not confident in your ability to properly reconnect and test the sensor, don’t hesitate to seek help from a professional mechanic.