In a vehicle’s engine, the connecting rod plays a significant role in transmitting the force from the piston to the crankshaft. Hence, ensuring the connecting rod is in good condition is pivotal to a smoothly running engine. This article will guide you through the process of checking the connecting rod without using phrases like “firstly,” “then,” “besides,” or “in conclusion.”
Identifying possible signs of a problem is the initial step towards checking the connecting rod. These could include unusual noises from the engine, oil leaks, or a noticeable decrease in engine performance. Although these signs don’t conclusively point to a faulty connecting rod, they could indicate a problem that needs further examination.
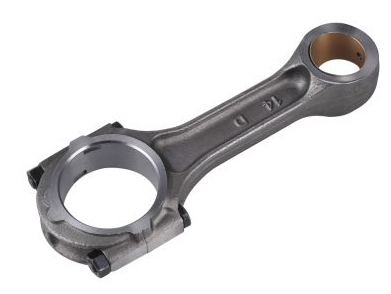
Upon noticing any potential signs of trouble, the next logical step would be to conduct a physical inspection of the connecting rod. To do this, you would need to disassemble the engine, which should be done by a professional mechanic. Once the engine is disassembled, the mechanic will examine the connecting rods for any visible signs of damage or wear. Wear on the connecting rod can cause major engine problems, so a detailed inspection is vital.
One essential factor to consider during the inspection is the condition of the connecting rod bearings. These bearings, which help to reduce friction between the rod and the crankshaft, can wear down over time. If the bearings show signs of excessive wear or damage, it could indicate a problem with the connecting rod.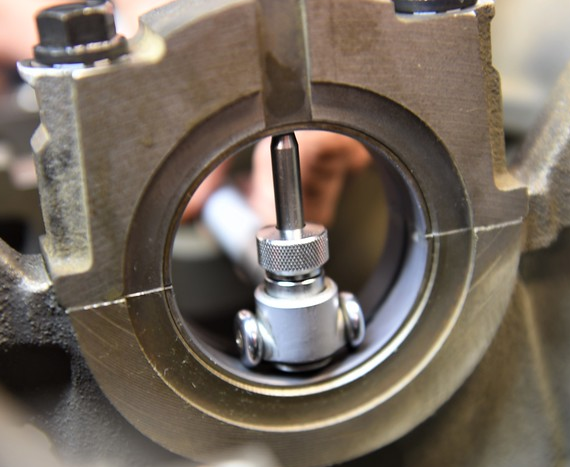
Another key element to assess is the straightness of the rod. A bent or twisted connecting rod can lead to engine damage and decreased performance. You can use tools such as a connecting rod aligner or a dial indicator to check for any signs of deformation.
Next, you should check for cracks in the connecting rod. Cracks can lead to rod failure, which can cause severe engine damage. Professionals often use methods such as Magnaflux or dye penetrant testing to detect cracks in the metal.
Lastly, measuring the dimensions of the connecting rod is an integral part of the checking process. By using a micrometer or other precise measuring tools, you can measure the diameter of the rod’s big end and small end. These measurements need to fall within the specifications provided by the engine manufacturer. If the measurements are off, the connecting rod may need to be replaced or machined to fit properly.
In essence, checking the connecting rod involves several critical steps, from identifying potential issues to conducting a detailed inspection and measurements. Always remember that ensuring the connecting rod is in good condition is fundamental to the smooth operation and longevity of your vehicle’s engine. If you’re uncertain about any steps in this process, it’s best to consult with a professional mechanic. They have the expertise to correctly identify and resolve issues that may otherwise go unnoticed.
How Do You Check the Connecting Rod?
Table of Contents
- Identifying Signs of Trouble
- Physical Inspection of the Connecting Rod
- Assessing the Connecting Rod Bearings
- Evaluating Straightness of the Rod
- Checking for Cracks in the Rod
- Measuring the Dimensions of the Connecting Rod
Identifying Signs of Trouble
A crucial step in the process of checking the connecting rod involves identifying possible signs of a problem. Signs can include engine noises that were not present before, oil leaks, or a noticeable decrease in engine performance. While these signs don’t definitively indicate a problem with the connecting rod, they could suggest an issue requiring further investigation.
Physical Inspection of the Connecting Rod
Conducting a physical inspection of the connecting rod involves disassembling the engine, which should be done by a professional mechanic. Once the engine is taken apart, the mechanic will carefully look for any signs of damage or wear on the connecting rod. Wear and tear on this vital component can lead to serious engine issues, necessitating a thorough and detailed inspection.
Assessing the Connecting Rod Bearings
The connecting rod bearings play a crucial role in reducing friction between the rod and the crankshaft. Over time, these bearings can wear down, so part of checking the connecting rod involves assessing the condition of these bearings. Excessive wear or damage could indicate a potential issue with the rod itself.
Evaluating Straightness of the Rod
A bent or twisted connecting rod can lead to engine damage and decreased performance. Thus, checking for straightness is vital. Tools such as a connecting rod aligner or a dial indicator can be employed to detect any signs of deformation in the rod.
Checking for Cracks in the Rod
Cracks in the connecting rod are a serious issue that can lead to rod failure and severe engine damage. Professional mechanics often use techniques like Magnaflux or dye penetrant testing to identify any cracks in the rod’s metal structure.
Measuring the Dimensions of the Connecting Rod
Lastly, an essential part of checking the connecting rod involves measuring its dimensions. By using a micrometer or similar precision tools, the diameters of the rod’s big end and small end can be measured. These measurements should align with the specifications provided by the engine manufacturer. If not, it may be necessary to replace the connecting rod or machine it to fit properly.