Which way does the connecting rod go? This is a crucial question for anyone looking to assemble or repair an engine, as the proper installation of connecting rods is vital for optimal performance and engine longevity. This article will discuss how to determine the correct orientation and install connecting rods the right way.
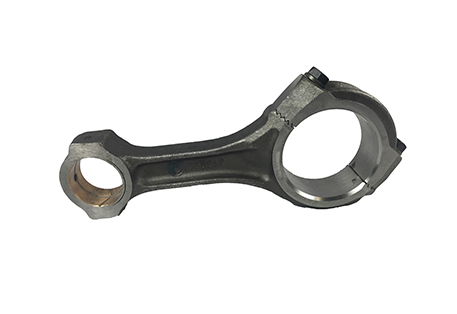
Identifying the Orientation of Connecting Rods Connecting rods often have markings or specific design features that indicate their proper orientation. These indicators may include:
- Manufacturer’s markings: Some connecting rods have an arrow, serial number, or the manufacturer’s logo on the side that should face the front of the engine.
- Bearing tangs: Most connecting rods have bearing tangs or notches, which are small protrusions on the big end that help to align the bearing shells. These typically face the same direction during installation.
Preparing for Connecting Rod Installation Before installing the connecting rods, ensure all components are clean and free of debris. It’s essential to lubricate the connecting rod bearings with engine oil or assembly lube to minimize friction and wear during the initial engine startup.
Installing Connecting Rods: Step-by-Step Process Follow these steps for the proper installation of connecting rods:
- Align the connecting rod and piston: With the connecting rod and piston separated, ensure the markings or design features indicating the proper orientation are visible. Slide the piston pin through the piston and connecting rod, securing them with circlips or locks if required.
- Install the piston and connecting rod assembly: Carefully lower the piston and connecting rod assembly into the cylinder bore, using a piston ring compressor if necessary. Ensure the orientation indicators on the connecting rod face the correct direction.
- Attach the connecting rod to the crankshaft: Rotate the crankshaft until the corresponding journal is in the correct position for connecting rod installation. Apply engine oil or assembly lube to the bearing shells, then slide the connecting rod big end onto the crankshaft journal.
- Secure the connecting rod cap: Align the connecting rod cap with the connecting rod, ensuring the markings and bearing tangs match. Install and torque the connecting rod bolts according to the manufacturer’s specifications, using a torque wrench to ensure accuracy.
The Importance of Correct Connecting Rod Orientation Proper connecting rod orientation is essential for optimal engine performance and longevity. Incorrect installation can lead to issues such as uneven wear, reduced engine efficiency, and even catastrophic failure. By understanding which way the connecting rod goes, you can prevent these problems and ensure a smoothly functioning engine.